HQS Tasks
HQS Tasks is a solution to execute scientific software applications on a remote high-performance computing environment, and to control the execution from anywhere, such as your favorite local Python environment.
By providing access to the cloud, and therefore a virtually unlimited amount and a variety of compute hardware, the user is able to leverage a vast amount of compute resources with almost no additional setup effort.
Every software HQS releases as a task can be executed on this computing platform.
About this documentation
This documentation is targeted to end-users that want to use these software applications via the task system. We assume a basic understanding of software development with Python as the primary programming language, ideally using Jupyter Notebooks. Besides that, no specific skill level or background is assumed.
If you are new to HQS Tasks, please start reading about its Architecture to get a brief understanding of the components.
The Architecture of HQS Tasks
The HQS Tasks system is composed of a client and a backend part. For a better understanding of the remainder of this documentation, we first describe the roles of these components and how they interact with each other.
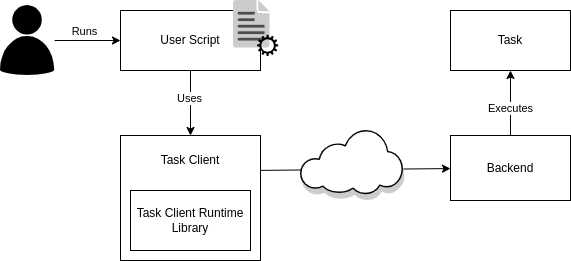
The Task
The task is the actual computation whose result the user is interested in. A task is used by writing a Python script that uses the client package of the task. The client package instructs a backend to schedule the execution of the task with the desired parameters and fetches the result as soon as it is available.
The Client Package
The task client package is, simply speaking, the part of HQS Tasks that runs (usually) on your local machine. The client package is specific to the actual task (or a group of tasks) that you want to execute. Running a task using the corresponding task client is as easy as calling a local function, while leveraging remote computational resources.
The task client packages for different tasks all use the same task client runtime library, which ensures a consistent interface for the configuration of HQS Tasks across a wide variety of tasks.
The Backend
There are different types of backends to execute tasks, as one of the main purposes of HQS Tasks is to make it possible to run them in various powerful remote computing environments and access them as simply as calling a local function.
In the task client runtime you configure which backend is to be used. This information is used to communicate with the actual backend.
Depending on which backend we are talking about and how your setup looks like, this backend is usually hosted somewhere else, such as in the cloud (see REST) or in an on-premise high-performance compute cluster (see SLURM).
Also, the task implementations (the actual computation to be performed) are deployed in the backend, or in a way the backend can interact with (which is, of course, again dependent on the concrete type of backend).
The backend then takes care of actually executing the tasks submitted by the task client, and will also manage the necessary provisioning (a.k.a. reservation or allocation) and de-provisioning (i.e., freeing) of the hardware resources before / after the task execution.
It can furthermore keep track of the execution process and gather the results. However, this is always initiated from the client, which we will describe below.
Communication Between the Client and the Backend
Let us briefly go through the sequence of executing a task in a typical setup, where the backend is hosted remotely.
-
Submission: The client tells the backend that a new task execution should be started. The so-called task execution request bundles the information required to do so, which comprises the name (and version) of the task, what the input is, and which hardware resources shall be provisioned.
-
Observation: The client periodically asks the backend for the state of the task execution; most importantly, whether it has finished.
-
Fetching Results: Once the task has finished, the client asks the backend for the results: if it was successful, and – depending on that – either the task's output or an error report. Also, the task log and some metrics are provided as meta information, all of which is composed in the so-called task execution response.
One important thing to note here is that there is no active communication from the backend to the client. It is always the client asking the backend for any "news," not the backend communicating them to the client actively. The benefit of this behavior is that you do not need to worry about losing network connection while a computation runs. As soon as a connection is available, the client is able to catch up on the state of the computation.
Backends for running HQS Tasks
As described in Architecture, HQS Tasks is a system composed of a client part and a backend part.
The backend is the component which a client communicates with in order to submit new task executions, observe their state and finally fetch the result. Depending on the type of backend, the actual backend's logic is on a remote service and decoupled from the client. The caching mechanism allows the client – after tasks have been submitted – to detach by simply cancelling the local script; the executions still continue running in the backend, and later the client can re-attach to finally fetch the results.
Here, we briefly describe what types of backends can be used to execute tasks. Details are then found on the corresponding backend details page.
Local
The "local" backend is intended to be used when you want to run a task directly on the same machine on which the client script is running on.
This is the default backend (but in the future we might switch the default to REST, see below).
REST (Cloud)
The REST backend will execute tasks in the cloud. The client will communicate with HQS Core hosted in the HQS Cloud, and tasks are running on machines provisioned on demand.
This backend is somewhat unique in the sense that it also serves its own database in which all task executions are being collected.
Currently, this is the primary backend to be used for most users. But you still need to configure the client to use it, since the default is the local backend (we might switch this to the REST backend in the future, though).
Slurm
The Slurm backend will execute tasks on a compute cluster powered by the Slurm workload manager. The client will communicate via SSH to any "login node" that is connected to any Slurm setup.
Running Tasks
On this page, you learn how to run your first task. We assume you have read the previous pages of this documentation, where we briefly explained how HQS Tasks is supposed to work and what the role of the client and backend are, respectively.
Simple Example
For the purpose of testing the task system in general and for learning the basic concepts, example tasks have been developed, which we are going to execute here.
Furthermore, the code examples are using the REST backend (but can of course be adapted to use a different backend by simply changing the corresponding configuration section). We therefore assume that its prerequisites are met.
Last but not least, we assume you have set up a corresponding Python environment in which we can install the dependencies.
Installing the client package
To get started, we need to install the Python package hqs_tasks_execution, which is responsible for everything regarding the execution of tasks that is indepedent of a specific task or application.
Then, depending on the task we want to execute, we need the corresponding task client package. The client package for the example tasks used in this tutorial is hqs_task_example_client.
Install the packages using hqstage:
hqstage install hqs_tasks_execution hqs_task_example_client
In the next steps we will write a script, which we usually call the user script, that uses these packages to execute tasks. You can use any tooling to write your Python script, for example Jupyter.
Configuring the backend
We recommend that the code in which the HQS Tasks backend is configured is always placed at the very top of a task client script. This is because ideally, these lines can be changed in order to "move" from one backend to another, and are as such not defining what your script is doing, but where it is doing it.
Since we are using the REST backend, we just configure it with the defaults, according to its documentation:
from hqs_tasks_execution.config import global_config, BackendConfigurationREST

global_config.backend = BackendConfigurationREST()
Running a task
Most programming tutorials start with a "hello world" as a minimal example. The purpose is to learn the very basic steps to get first things done, without much "meaning".
So the first task which we will execute is hello, which takes a single string argument as the input and will return (as the output) a greeting message.
The function hello in the following code is the so-called task client function which merely serves as an interface for running this task using the HQS Tasks system.
Note that the task client functions are asynchronous (also called coroutines), i.e., they have to be called using the async/await syntax (see the asyncio package).
import asyncio
from hqs_task_example_client import hello

async def main():
    message = await hello("world")
    print(message)

asyncio.run(main())
If you are running inside a Jupyter Notebook, Jupyter will automatically provide an event loop for you. Hence, in a notebook, you can simply use the following code:
from hqs_task_example_client import hello

message = await hello("world")
print(message)
The above code will execute the task and, once it finished successfully, the output value is printed.
Concurrent Execution
Task client functions can be executed concurrently using asyncio.gather (see asyncio documentation) . This is particularly useful in combination with the REST or Slurm backend, where individual tasks may run on separate machines.
import asyncio
from hqs_task_example_client import hello


async def main():
    tasks = [hello("world"), hello("again"), hello("there")]
    messages = await asyncio.gather(*tasks)
    print(messages)

asyncio.run(main())
Note that calling a task client function (or a coroutine in general) without the await keyword generates an awaitable object, i.e. an object that can be used in an await expression. The asyncio.gather function takes such awaitables as an input.
Configuration
The HQS Tasks execution client is configurable via code that is in the user script, i.e., the script you use to schedule tasks. On this page, we first describe in which ways you can apply configurations to your script and then which parameters are available to be configured.
Global vs. Scoped Configuration
All configuration parameters can be changed on a global level at any point in the script, also multiple times in the same script. The configuration is then effective for every subsequent call to any task client function or until the configuration is adapted again.
The syntax for this is as follows:
from hqs_task_execution.config import global_config

global_config.provisioning.hardware.memory = 4096
This sets the parameter provisioning.hardware.memory to 4096 for the remainder of the script.
Alternatively, most of the configuration parameters (see parameter table below) can also be applied to a part of a script inside a Python with-block. The effect of this is that after this with-block, the global parameter values are restored. This is in particular useful if you want to apply a specific parameter value only for a part of the script, maybe even for a single task, and don't want to affect subsequent task executions.
The above example translates to:
from hqs_task_execution.config import scoped_config

# For any task executed here, the "global config" is used

with scoped_config(memory_mb=8192):
    # For every task executed inside this block, the parameter "provisioning.hardware.memory"
    # is set to 8192. All other configuration options from the "global config" apply.
    ...

# For any task executed here, the "global config" is used
Note that due to the fact that we use a function call with keyword arguments,
sub-parameters like the provisioning.hardware.memory in the above example are spelled differently here,
with a so-called "shortcut" (e.g., without the provisioning.hardware prefix).
Also, for some parameters we introduce variants to be able to specify values in specific units.
In the example above this is memory_mb for specifying the memory in MiB or memory_gb for GiB.
The following rules apply:
- Parameters changed globally (or kept at the default values) are unchanged by any scoped config block. Changing global configuration from within a scoped block is technically possible, but only applied after the last scoped config closed, and therefore not recommended.
- Scoped configurations can be nested. If a parameter is changed on different levels, the most nested one is used. Of course, if that block is finished, the previous one is restored.
In other words, a scoped config block copies the current configuration and applies the changes mentioned in the function call, which then becomes the "new current" configuration, starting with the current configuration being the global one when entering a top-level scoped config block.
Configuration Parameters
In the following, we list the most commonly used configuration parameters. Parameters needed for highly specific use cases are currently not documented here. Also, some parameters are specific to the type of backend you configure; these sub-parameters are documented on the page of the corresponding backend.
Parameter Key in global_config | Shortcut for scoped_config(and variants) | Type (and variants) | Description |
|---|---|---|---|
backend | - | BackendConfiguration... | Configuration of the task execution backend (see sub-pages in the Backends section) |
cache | - | CacheConfiguration... | The type of storage used to store cache data (see Caching) |
cache.mode | cache_mode | hqs_tasks_execution.config.CacheMode (enum) | The mode in which the cache shall operate (see Caching) |
throttling.disable_submissions | disable_submissions | bool | When set to True, no execution is actually submitted; script can only succeed when everything is in cache |
provisioning.hardware.vcpu | vcpu | float | The number of virtual CPU shares allocated for executing the task |
provisioning.hardware.memory | memory_mb( memory_gb) | int( int) | The amount of memory in MiB (or GiB) allocated for executing the task |
provisioning.hardware.gpu | gpu | int | The number of GPU cards allocated for executing the task (experimental) |
provisioning.timeout | timeout( timeout_minutes / timeout_hours) | datetime.timedelta( float / float) | The amount of time the task is allowed to run for until it times out |
The (Binary) File API
Under the hood, a task client uses JSON to communicate with the backend. Since JSON, however, does not efficiently encode binary data, HQS Tasks has support for efficiently transmitting binary data between tasks, by providing the binary file API.
Briefly explained, every task can write (for outputs) or read (for inputs) binary files. (This, of course, depends on the concrete task we are dealing with. Some tasks do not make use of this feature.)
Then, these files are simply referenced in the JSON input or output by their filename (or URL, as described below), making it quite straightforward for both task implementations and the client to interact with the files: by simply reading from (or writing to) files as described by the JSON input / output.
Abstract Example
All is best understood by giving an example.
Let us consider two task definitions:
read_file: The JSON input contains a reference to a file. The task reads that file. The output is the file content in the form of a string in a JSON document.write_file: The JSON input is a string. The task writes this string to a (local) file. The output is a reference (filename) to the file written.
In fact, these tasks are exposed in the hqs_task_example_client package.
Then, you could write the following client script:
from hqs_task_example_client import read_file, write_file
from hqs_tasks_execution.config import global_config, BackendConfigurationREST

global_config.backend = BackendConfigurationREST()

# Specify a file content for this example
message = "Hello world!"

# The task which writes the string to a file. The returned value is a FileRef object
# (from hqs_task.types.fileref)
file_ref = await write_file(message)

# The task which reads the file given by the FileRef object will return its contents
# again as a string.
read_back = await read_file(file_ref)

# When the above worked as intended, this assertion will be true.
assert read_back == message
Note that it is currently not possible to provide (new) binary data as an input to a task from a user script.
Remote Files
As the true power of HQS Tasks lies in executing tasks on a remote machine (e.g., in the cloud using the REST backend), the question arises how in the client script you can read the content of a file produced by a task.
In fact, a key component is added for remote backends: the uploading and downloading of files to / from a remote file storage.
If a remote backend is configured and file references are returned by a given task, the corresponding files are automatically uploaded to a remote file storage. In this case, the files written by a task are uploaded after the actual task has completed, but before your client "sees" the result, and the local file reference is being replaced with a URL which represents that file.
For the current implementation in the REST backend (which we might adjust in the future), we add a bit more explaination to this:
- A file reference in the output of a task points to a "signed S3 URL". This can be downloaded with any tool in the client, e.g., with the
requestslibrary in a Python script, or by opening the URL in a web browser. However, this link expires after some time, which we do not speficy here concretely, since it depends on several implementation details. The important fact is that it will expire at some point. - Any such URL can be used in an input to some follow-up task, like in the example above. You can even use expired URLs for that as the REST backend automatically "expands" the validity so that the task implementation can access it.
- If you encounter the situation where you want to access a link from a file reference which is expired, you need to refresh the output of the task execution by calling the task function again. Due to caching (if enabled), this will not trigger a new execution, but update the cached result with new file signatures.
Caching of Task Executions (Client-side)
The HQS Tasks client is equipped with a (client-side) caching mechanism. As the name might incorrectly suggest, the purpose of this cache is not only to speed things up, but plays a primary role in the user's workflow and experience when using tasks.
The key point to understand is that whenever a task client function is being invoked (which is usually the statement with the await keyword), it is not necessarily true that a new task execution is submitted. We rather check if an execution has already been submitted before (which might be finished or still pending),
and only if that is not true, a new execution is submitted. Then, the client (while running) tracks the state of the execution in the backend and stores the (last reported) state in a local memory: the cache.
This makes it possible to "detach" your client from the actual execution backend at any time by simply cancelling your (locally running) script. When re-running the exact same script at any point later, it automatically finds the previously submitted tasks and "re-attaches" to them. With re-attaching, we mean the status is being fetched, the local cache is being updated accordingly, and your script can continue since only now the "awaited" task client function is returning the task's output.
Cache Location (and Types)
There are different types of caches (or to be more precise: storage implementations, i.e. where and how the data is being stored). This is independent of the below mentioned logic and the different cache modes.
Shelve
This is currently the default cache type. The data is stored in (a triplet of) files, normally located in the same folder as the script you are running, but this location can be adjusted.
Note that we do not give any guarantees for cache files being compatible between different versions of the HQS Tasks implementation.
To enable (and configure) this cache type, add the following configuration code to your client script:
from hqs_tasks_execution.config import global_config, CacheConfigurationShelve

global_config.cache = CacheConfigurationShelve(
    file="my_custom_cache_file",  # Note: This is optional.
)
SQLite
This uses a (file-based) SQLite database. The database file is normally located in the same folder as the script you are running but this can be adjusted.
To enable this cache type, add the following configuration code to your client script:
from hqs_tasks_execution.config import global_config, CacheConfigurationSQLite

global_config.cache = CacheConfigurationSQLite(
    file="my_custom_cache_file.db",  # Note: This is optional.
)
Chained
This enables you to use several different caches (of the same or different type). The idea is that if a first cache does not hold the execution which we are about to execute, the second cache is investigated. If it contains it, we are lucky - the information is then also being stored (wrote back) in the first cache.
Use cases are when you want a fast local cache, but also a network-shared cache which you share with your colleagues.
Or if you change your cache type but want to "fall-back" to your existing (i.e., migrate the cache when being accessed on demand).
To enable this cache type, add the following configuration code to your client script (this demonstrates the second use case described above):
from hqs_tasks_execution.config import global_config, CacheConfigurationShelve, CacheConfigurationSQLite

global_config.cache = CacheConfigurationChained(
    caches=[
        # New cache: Primarily used.
        CacheConfigurationSQLite(),

        # Old cache: Used if not found in primary; will then write back to primary.
        CacheConfigurationShelve(),
    ]
)
Cache Reliability (Disclaimer)
Be aware that due to the cache being "just local files," which you could easily delete by accident (for example when you want to clean up your script folder or any other reason), you should never fully rely on the cache for storing valuable results. Also, we do not guarantee that there will never be an implementation error leading to accidental deletion of cache entries or the cache ending up corrupt due to whatever reason.
We recommend to store valuable results additionally in a safe location, a structured database, some archive, or have at least a backup of the cache files, depending on your needs.
However, depending on the concrete backend you use to run tasks, that might come with a fully-featured database which serves your purpose. For example, when using the REST backend, you can access the REST-API separately to browse and retrieve all of your task executions and their results. However, this is beyond the scope of this documentation.
Identifying Task Executions
Above we claimed that when re-running the script, it needs to be the exact same script for the caching mechanism to work. This is only half the story: for every task execution, if you already invoked the same task client function with the same input as before (and in the same version as before), the execution is being identified by the cache and the previous execution can be utilized.
You might observe in the gray caching-related log lines a somewhat cryptic string: the so-called "cache key". This is the identifier for the cache, composed of the task name, the task version (which usually equals the Python package version) and a hash-value of the input. Note that the actual task input is a JSON-serialization of the given Python object(s) which have been passed in the function, but usually the same (Python) values result in the same JSON value and therefore in the same hash value.
For tasks that have a stochastic behavior (implement randomized algorithms), it cannot be guaranteed that passing the same input will lead to the same result. When retrieving a previous execution of such a task from the cache, the corresponding result will remain the same even though a new execution of the task would lead to a different result. Hence, it is recommended to provide tasks exhibiting random behavior with a "random seed" parameter as an additional input argument. By passing different values for that parameter, multiple task executions are being submitted, because the input is technically different and therefore also the hash value and consequently the cache key by which they are identified. Other than that, the seed value is usually "just any value". Also, taking the caching mechanism into account, we achieve a deterministic behavior. (Without the cache, or when clearing it, it would only be deterministic if the task guarantees it.)
Cache Modes
The cache can operate in different modes. This can be configured using global_scope.cache.mode or scoped_config(cache_mode=...). The modes are found in the enum CacheMode from hqs_tasks_execution.config and are explained briefly in the following:
FULLY_CACHED(default): Cache everything. Utilize the cache for everything (submitted or finished). Update the cache entry with every received update.RESTART_FAILED: Ignore failed executions. Utilize the cache for submitted and successful, but not for failed executions. Update the cache entry with every received update.REATTACH_ONLY: Ignore finished executions. Utilize the cache only for submitted, but not for finished (successful or failed) executions. Update the cache entry with every received update.WRITE_ONLY: Ignore cache, but write results to it. Never utilize the cache, but still update the cache entry with every received update.DISABLED: Ignore cache, also never write to it. Cache is disabled completely (not utilized and also not written / updated).
In most cases, you want FULLY_CACHED, which is the default mode. Even when a task execution failed, in most cases (exceptions to this are discussed below) this is solved by changing the input; or (if it is a bug or a missing feature in the task implementation) the task client package receives an update in which case the version of the task changes. In both cases the cache key will be different, so a new execution will be submitted.
In the following cases you do not want to utilize the cache for a failed execution:
- When there was a fault in the task execution system. There are several technical reasons, which we can never completely list here. Note that in some cases some error might already have been raised on the client side before actually submitting anything in the backend, in which case no cache entry is being written.
- When the resources were insufficient (usually memory or time) to successfully execute the task for that particular input. The hardware provisioning options are not part of the cache entry identifier and hence increasing them would still utilize the cache entry in the default cache mode.
- For similar reasons, when you want to run performance benchmarks or just want to "play around" with different hardware parameters. This list is not complete, of course.
What we recommend in these cases is, when you are not sure which of the other cache modes is the "right" choice, to go through them in the above mentioned order. But keep in mind that, the less the cache is utilized, the more resources are consumed and hence the cost is rising, therefore we recommend to carefully play with this option and not just disable it completely when you experience something is being utilized from the cache although you didn't want that to happen.
If you have a long-running task and experience internet connection issues (e.g. ConnectionError exception), you can re-attach to the submitted task by executing the same task again. Note, that this only works for the cache modes FULLY_CACHED, RESTART_FAILED, and REATTACH_ONLY.
"Cache-Only" Mode
While it is technically not a cache mode, you can run your script in a mode in which we never submit new task executions. However, existing (pending) task executions are tried to be re-attached to, in order to fetch their results.
This mode can be enabled by setting global_scope.throttling.disable_submissions = True for the whole script, or scoped_config(disable_submissions=True) for a scope.
Hardware Resources for Running Tasks
In HQS Tasks, each task is intended to be executed on a machine for which we can control the available resources, at least to a certain degree. The process of setting up such an execution environment is called "provisioning."
The hardware resource types which can be controlled are:
- The number of (virtual) CPU shares (a.k.a. threads)
- The amount of memory
- The number of GPUs (experimental)
For each task definition some reasonable default values might be provided for these. However, for most tasks these defaults only make sense for smaller problem instances, and for bigger ones you definitely want to have more control over it.
To specify (or overwrite the defaults for) these values, set the corresponding configuration parameters either globally or in a scope.
Example:
from hqs_task_execution.config import scoped_config

with scoped_config(vcpu=8, memory_gb=32):
    # ...
For details about how to specify configuration parameters, please consult the Configuration page.
How these provisioning options are respected when actually provisioning / allocating hardware depends on the backend. See the detail page of the backend you are using. In particular, the local backend does not support all options.
Callbacks (Customizing the Client Logic)
This is for advanced users of the HQS Tasks client, and therefore only documented very briefly.
You can add custom logic to some events during the procedure of executing tasks and waiting for their results.
Currently, the client logic has the following "events":
creatingsubmittedreattachedprogressfinishedcache_writecache_hitcache_misscache_ignoredbackend_initializedinterrupt_waiting
The corresponding callbacks are named with an additional on_ prefix, and are available in the configuration object's top level (e.g. global_config.on_finished for the finished event).
To add behavior to an event, you register a function as a callback function to that event by simply decorating your custom function with that callback object.
Here is an example for a callback function which is to be invoked for any finished task execution:
from hqs_task_execution.config import global_config
from hqs_core_models import TaskExecutionRequest

@global_config.on_finished
def on_finished_task(request: TaskExecutionRequest) -> None:
    print(f"Task `{request.task_name}` just finished.")
When using an IDE which is capable of providing good support for the code model, you'll see the parameters the callback function can consume by inspecting the signature / docstring of the callback object (in that case global_config.on_finished).
The "Local" HQS Tasks Backend
This backend is intended to run HQS Tasks locally on your laptop, or, more precisely, on the same machine where the client script runs on.
This, of course, requires that the task and not just the task client package is installed on your machine. We therefore refer you to the documentation of the corresponding software package for installation instructions.
At the moment, this backend is more targeted towards tasks developers and less towards end-users.
Prerequisites
Before being able to use this backend, you need to install some additional (extra) dependencies. For this, please install the component to support local execution by adding [local] to the package name in the install command. For instance, using the example client package introduced in "Running tasks", the corresponding install command for hqstage is:
hqstage install hqs_task_example_client[local]
Configuration
In the current version of HQS Tasks, this is the default backend and does not need to be configured explicitly. However, since the primary backend which most end-users will be using is a different one, we consider changing this in the future. We therefore suggest, when you run tasks locally, to explicitly configure your client script to use this backend.
For that, add the following basic configuration to your client script:
from hqs_tasks_execution.config import global_config, BackendConfigurationLocal

global_config.backend = BackendConfigurationLocal()
Technical details
Tasks are run as a separate system process detached from the Python session of the user script. To be more precise, it is ran as a systemd scope unit.
Similar to other backends, you can interrupt waiting for the result of such a task execution by terminating the user script. Note that the task continues to run in the detached process. When re-running the user script, it tries to find and reattach to the previously started process. Cancelling such a running task can be done by interactively answering the question when being prompted when attempting to cancel the script, or by using the systemd CLI.
The "REST" HQS Tasks Backend
The REST backend will execute tasks in the cloud. The client will communicate with HQS Core hosted in the HQS Cloud, and tasks are running on machines provisioned on demand.
Prerequisites
To authenticate with the cloud, the client needs credentials. These are pulled from your HQStage configuration. For that, you need to have HQStage installed and initialized with a token with appropriate permissions.
If you are new to HQStage, please continue reading the following three steps.
If you already have HQStage set up, please repeat the steps 1 and 3 (create a new token with the additional permissions and re-initialize HQStage with that new token).
1. Account and Token on HQS Cloud
Before visiting the linked documentation, please be aware that we need different permissions than described in the linked article.
Create an account on HQS Cloud. Then, create a token as described in the "Account and Token" page of the HQStage main documentation. However, the token also needs the read and write permissions for the task_execution resource, besides the read permission for license.
2. Install HQStage
To install the HQStage tooling, we refer to the HQStage installation guide.
3. Initialize HQStage
Then, run hqstage init as described in the Basic usage guide and provide the above created token when being asked for it.
Configuration
To use this backend, add the following basic configuration to your client script.
from hqs_tasks_execution.config import global_config, BackendConfigurationREST

global_config.backend = BackendConfigurationREST()
This tells the HQS Tasks execution client to
- use the REST backend, and
- use the default settings provided by the HQStage configuration (technically, you can specify sub-parameters in the constructor call, but none of these are intended to be set by end-users and therefore are currently not documented here).
Cloud Database
This backend not only provides you with the power of running tasks on a variety of hardware machines utilizing the AWS cloud, but will also keep a copy of all tasks (inputs, outputs, state, etc.) in a cloud database.
Of course, all data is scoped to the user, so you can only access your own data, and no other user will be able to access it.
For end-users, we have created two ways for accessing the database:
- In the HQS Cloud web UI, available in the menu as Tasks Dashboard.
- A Python client which is currently under development and not released yet.
The "Slurm" HQS Tasks Backend
This backend is experimental. Additionally, the documentation is currently not complete.
When using HQS Tasks with the Slurm backend, all tasks will be submitted to a Slurm cluster.
To do so, the client connects to a "login node" using SSH, on which some Slurm CLI commands are expected to be available and used for the communication. In particular, these are sbatch and scontrol.
Configuration
To use this backend, add the following basic configuration to your client script:
from hqs_tasks_execution.config import global_config, BackendConfigurationSlurm

global_config.backend = BackendConfigurationSlurm(
    login_host="...",
    slurm_tmp_io="/mnt/shared/hqs_tasks/io",
)
This tells the HQS Tasks execution client to use the Slurm backend, with the following required sub-parameters to be configured specifically for this backend:
login_host(str): The hostname to which the client opens the SSH connection and on which Slurm CLI commands can be issued (sbatchetc.)slurm_tmp_io(str): A directory path which is accessible on the login node and any compute node on which the Slurm jobs will be running.slurm_tmp_io_local(str|None): The local directory path of theslurm_tmp_iofolder if it is accessible on the local machine (where the client script is running). If set, normal file access is used to transfer files between the local machine and the Slurm network; otherwise SSH is used to transfer them from the login node.
Besides these, the following optional sub-parameters can be configured, depending on the needs:
login_user(str): The username for the SSH connection to the login nodessh_extra(list[str]): Any extra parameters to be appended to the command line when issuing SSH commands (e.g., for specifying authentication parameters)sbatch_extra(list[str]): Any extra parameters to be appended to thesbatchCLI command (e.g., for specifying Slurm-specific provisioning options)slurm_script_shell(str): The login shell type to be used for the automatically created Slurm submit scripts; defaults to/bin/bashpreparation_script_before(list[str]): A list of commands to be added to the Slurm submit script before the task-specific preparation scriptpreparation_script_after(list[str]): A list of commands to be added to the Slurm submit script after the task-specific preparation script (but still before running the task CLI)debug_slurm_script(bool): When set toTrue, the script which is used when submitting the Slurm script is being dumped which helps debugging the preparation script and the backend itself; defaults toFalse
Example Configuration (using Conda / Micromamba)
First of all, note that to use this backend, the task needs to be made available to the Slurm nodes in some way (i.e., the environment needs to be prepared for the task execution). This needs to be taken care of manually, and there are different options to achieve this.
Here we demonstrate one option to do so, and show how to configure the client in the user script to run tasks in that environment.
Preparation: Create the Environment
We assume conda / micromamba is installed on the Slurm nodes. We create a new environment on the shared network drive which is mounted on the Slurm nodes. This guide assumes that to be /mnt/shared (like shown above). The name of the environment we create can be chosen freely and it may be installed in any sub-folder of the network drive.
The following command creates such an environment and initially installs Python in it (please adjust the path accordingly):
micromamba create -n /mnt/shared/hqs_tasks/envs/hqs_task_example python=3.13
Then, activate the environment:
micromamba activate /mnt/shared/hqs_tasks/envs/hqs_task_example
Finally, install the software needed to run the task:
- the task implementation itself, for example
hqs_task_example - a general execution wrapper script called
hqs_task_execute
Simply install these using hqstage:
hqstage install hqs_task_example hqs_task_execute
Then, make sure that jq and curl are available on the Slurm nodes, since those are non-Python dependencies for running the task. To install them (if they are missing), a little helper script is shipped and available in the PATH which can now be invoked with the following command:
hqs-task-execute-install-requirements
Configuration
Now the only thing left to do is to tell the client to use (activate) this environment in the script sent to the Slurm node where the task will be running.
This is done by specifying the preparation_script_before option in the backend configuration. We need two commands: one will initialize conda / micromamba, which is usually done automatically for interactive shell sessions but a Slurm script does not fall into this category. The second command then activates the environment, like we did above when we installed everything.
from hqs_tasks_execution.config import global_config, BackendConfigurationSlurm

global_config.backend = BackendConfigurationSlurm(
    login_host="...",
    slurm_tmp_io="/mnt/shared/hqs_tasks/io",

    # Script needed to activate the environment:
    preparation_script_before=[
        'eval "$(micromamba shell hook --shell bash)"',
        "micromamba activate /mnt/shared/hqs_tasks/envs/hqs_task_example",
    ],
)
Current Limitations / Caveats
Since this backend is currently in an experimental state, it's not feature-complete.
The following is a summary of issues / current limitations:
- The login node is put on high load when many users are executing client scripts simultaneously, as in the current implementation we are opening a new SSH connection for every CLI command. You can solve this externally by configuring SSH to use a permanent connection for the login node using SSH Multiplexing.
- Manual configuration of environments to run tasks in (conda / module); proper task versioning almost impossible right now. (Also, automatic task deployment is currently not implemented in contrast to the REST backend.)
- Tasks are not containerized even if docker is available (maybe we will allow both containerized and non-containerized setup in the future).
- Provisioning defaults of tasks not respected (but per-execution provisioning options are).